
Table of Contents
Mood boards: what they are and how they can help you
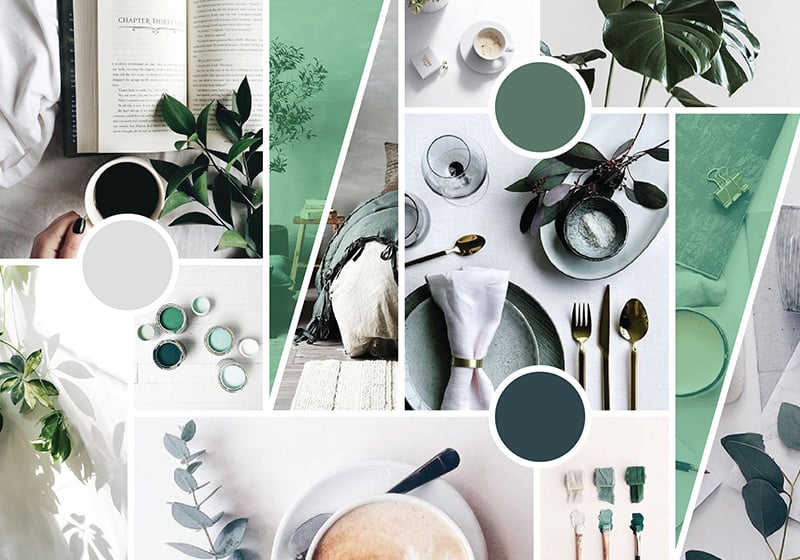
Have you come across the term ‘mood board’ before? It’s a collage of images, text, materials and samples that represent an idea, a concept or the inspiration for a project. It can be an extremely useful visual tool for designers, creatives, marketers and anyone else looking for a tangible way to visualise and define an idea or concept. A mood board can help you reinforce your ideas, communicate your vision to others and guide a project along a clear and defined pathway.

How mood boards work: the creation process
Creating a mood board is not as simple as randomly assembling images and materials. It is a methodical process involving researching, selecting and bringing together various visual elements that collectively communicate a certain mood, concept or direction. Here are some basic elements you’ll need to devise and develop your own mood board:
Defining objectives: Before you begin, it is essential you have a clear understanding of what you hope to communicate or accomplish with the mood board. Whether it is for a branding project, a fashion collection or a website redesign, you need to determine what message or feeling you want to evoke.
Research: Once you’ve defined your objectives, the research phase begins. This may include browsing magazines, websites, catalogues, art books or any other relevant resources. During this phase, collect images, colours, patterns, textures, words and anything else that resonates with your established aim.
Selection: After gathering a wide range of materials, it’s time to sift through them and select only those elements that best represent your vision. This step requires judgement – not everything gathered during the research phase will necessarily have a place on the final mood board.
Organisation and layout: Once you’ve selected the various elements to include, the organisation phase begins. Elements need to be arranged so that they interact harmoniously with each other, guiding the eye through the mood board and telling a coherent story. Some designers prefer a gridded, orderly layout, while others opt for a freer, more organic approach.
Reflection and updates: Once you’ve finished your mood board, you should leave it for a while then come back and examine it with fresh eyes. This may reveal areas for improvement or elements that don’t quite fit. You may need to update it once or twice before you get to a final version that feels ‘right’.
Sharing and feedback: If the mood board was created as part of a team or for a client, now is the time to share it and gather feedback. This feedback can lead to further refinements and modifications, ensuring the mood board conveys the intended message.

Mood board examples: a deep dive into the visual world
Mood boards come in many different forms and achieve different aims, depending on the needs of the specific project or the initial objective. Here are some classic examples of mood boards that provide an overview of the various opportunities this tool provides and the places it can be applied.
Branding mood board: This type of mood board is often used in the early stages of creating a brand or rebranding. It brings together the colours, fonts, textures and images that represent the essence of the brand, giving designers a clear vision of the brand’s identity and how it should be communicated visually.
Interior design mood board: A place for interior designers to gather together materials, fabric swatches, paint colours and photographs of furniture or rooms that inspire their approach to decorating a specific space. This type of mood board may also include preliminary sketches or drawings.
Fashion mood board: Often used for collections or photo shoots, fashion mood boards can contain magazine clippings, fabric swatches, accessories and anything else that captures the atmosphere or style the designer wants the collection to have.
Web and UI design mood boards: For those who design websites or user interfaces, a mood board can include screenshots of other sites, examples of icons, colour palettes, typography and anything else that helps define the look and functionality of the design.
Photography mood board: This can act as inspiration for a photography project or provide the client with an idea for a style or concept. It could include inspirational images, sketches of possible shots and notes on the themes and emotions to be evoked.
Storytelling mood board: Often used in the worlds of advertising and cinema, this type of mood board is focused on narrating a story. It may contain images representing characters, settings, key points in the plot or particularly gripping moments.
These are just some examples of the countless ways mood boards can be used. Their real power lies in their flexibility: regardless of the industry or discipline, they can serve as a visual compass, guiding the creative process and keeping everyone aligned with a shared vision.

Digital or printed mood boards: pros and cons
While the essence of a moodboard is always the same – capturing and communicating a vision or inspiration – the way it is made and presented can vary greatly. In particular, the advent of technology has introduced a new way of doing it: the digital mood board.
But should you go for a traditional printed moodboard or its digital cousin? Let’s have a look together at the pros and cons of each one:
Digital mood board
Pros
Versatility: Digital mood boards are easy to edit. Adding, removing or rearranging elements can often be done in a few clicks.
Sharing: You can share your digital mood board with anyone, anywhere, through a link or email. This is especially useful for teams working remotely or when presenting projects to clients in different locations.
Interactivity: As we mentioned earlier, digital tools can include interactive elements like videos, animations, sounds and links.
Sustainability: There is no need to use paper, ink or other physical materials.
Cons
Reliance on technology: Technical problems like a hardware failure or slow internet connection could interrupt the presentation.
Less tangibility: Unlike the printed versions, you can’t ‘touch and feel’ a digital mood board, which reduces the sensory experience.
Printed mood board
Pros
Tangibility: The ability to physically touch and feel elements and move them around can create a deeper, more sensory connection with the material and provide a more concrete way of stimulating associations of ideas.
Permanence: A printed mood board can be hung up in a studio or office, serving as a constant reminder and source of inspiration.
No reliance on technology: A printed mood board is accessible whenever you need it, with no need to worry about dead batteries or connection problems.
Cons
Less flexibility: Once printed, it cannot be edited easily. Each change requires a new printout.
Size limits: You have limited space available: since it has to be carried or hung up, an analogue mood board is conditioned by the materials affixed to it and the materials on which it is printed.
Sharing issues: To show your printed mood board to someone in another city or country, you may have to ship it or create a digital replica.
Clearly, each type of mood board suits different circumstances. For example, during early brainstorming, a physical mood board could provide a more engaging experience and foster more stimulating collaboration. But when it comes to the final presentation to an international client, a digital version might be more practical and versatile.
Ultimately, the choice between digital and printed mood boards depends on the project’s specific needs, the target audience and the resources you have available. Both have their strengths and, when used correctly, both can be powerful ways of communicating ideas and gaining inspiration.

Mood boards: how they help you come up with new ideas
As we have seen, mood boards are a powerful tool for creative professionals to have at their disposal. But looking beyond their role of organising and presenting concepts visually, why are they so effective in sparking new ideas?
Visualisation and connection: The human brain processes visual information extremely efficiently. When you see a variety of images and concepts represented visually in front of you, your brain automatically begins to seek out connections and patterns. This process can reveal relationships and ideas that might not have been immediately obvious had they been presented in a different format or taken individually.
Judgement-free space: A mood board, especially in the early stages, is somewhere you can explore ideas with no constraints. This sense of freedom can often lead to out-of-the-box thinking and innovative solutions.
Protection from information overload: In the digital age, we are constantly being bombarded with information. Creating a mood board allows you to pause, distance yourself from the noise and focus only on what is essential. This can pave the way for mental clarity, which is conducive to generating new ideas.
Interactivity and manipulation: Digital tools allow us to manipulate and interact with the different parts of the mood board. This dynamic interaction can lead to unexpected discoveries and new approaches.
Compare and contrast: Mood boards incorporate a wide variety of elements from different sources and inspirations, providing fertile ground for comparing and contrasting ideas. Comparing different concepts can lead to new combinations or new ways of interpreting existing approaches.
Tips for creating an effective mood board
Producing a mood board requires a combination of creative vision and organisational skills. Each mood board is unique and should reflect the essence of the project for which it was created. However, there are some universal principles and practical tips that can help you create an engaging and effective mood board:
Collect with abandon: In the initial stage, give yourself the freedom to collect anything that inspires you, without worrying too much about consistency or its relevance to the wider project. This could be images, colours, words, fabric samples or anything else. Doing this will open your mind and help you embrace different options.
Select carefully: After the collection phase, take a moment to reflect and filter what you have collected. Not everything you chose will be relevant. Select the elements that best communicate the essence and atmosphere you wish to convey.
Consistency is key: Make sure the elements you choose have an element of consistency. Although each element has its own weight, the strength of a mood board lies in its overall cohesiveness. Colours, textures and images should complement each other and create visual harmony.
Less is more: Sometimes, less really is more! Although you might be tempted to include numerous elements, an overcrowded mood board can confuse rather than clarify. Be concise and aim for simplicity.
Structure it clearly: Organise your moodboard so that it has a clear flow. It could be centred around a dominant image, or follow a path from left to right, or from top to bottom. This structure will guide readers’ eyes and help communicate your message more clearly.
Integrate feedback: As we’ve already mentioned, a mood board is a communication tool. After presenting it, gather feedback and consider whether you need to make any changes. This review process can help you further refine your vision.

How to present your mood board and keep your audience engaged
Presenting a mood board is as much of an art as creating one. When presented effectively, a mood board can engage, inspire and persuade your audience. Whether you’re presenting to a client, team or group of stakeholders, here are some tips for maximising your impact:
Preparation and contextualisation: Before you unveil the mood board, set the scene. Begin by providing a small amount of context about the project or idea you are presenting. Explain why you chose to create a mood board and how it reflects the project’s vision and values.
Visual story: Instead of presenting each element individually, try to tell a story. Start with the elements that provided the initial inspiration and then show how they evolved and became interconnected, before presenting the overall vision.
Physical interaction (if possible): If you are using a printed mood board, consider allowing your audience to touch and feel the materials. Physical interaction can create an emotional connection and make the experience more immersive.
Use annotations: If you are presenting a digital mood board, annotations can be helpful. These brief notes can explain the reason you chose a particular element or highlight a particular aspect you want to emphasise.
Be open to feedback: Once you have presented your mood board, encourage questions and feedback. This not only shows your openness to collaboration, but can also provide valuable insights to help you further refine your vision.
Tools and software for creating mood boards
In the digital age, mood board creation has been revolutionised by a range of tools and software that allow creatives to build, edit and share their visions with ease. These digital tools not only simplify the process, but also offer new opportunities to incorporate interactive and multidimensional elements. Let’s take a look together at some of the best tools and software out there for making impressive mood boards:
Pinterest: A favourite of designers and creatives in every industry. Pinterest allows you to create themed “boards” by collecting and organising images and content from around the web. You can comment, organise and share your boards, making it a versatile tool for visual brainstorming too.
Canva: Known primarily as a graphic design tool, Canva also includes features dedicated to creating mood boards. You can choose from a variety of layouts, incorporate graphic elements and fully customise your design.
Adobe Spark: Part of the Adobe product suite, Spark allows you to create visually appealing mood boards by combining images, text and video. Its intuitive interface makes it ideal for beginners and professionals alike.
Miro: This online visual collaboration platform is perfect for teams who want to work together to create mood boards. Miro provides a digital whiteboard where you can place images, stickers, notes and more in real time.
Moodboard: This app, specifically designed for creating mood boards, has a simple interface for dragging and dropping images, text and other elements. You can also explore mood boards created by other users to gain inspiration.
Conclusion
Whether you are a designer looking for inspiration or an entrepreneur trying to communicate your vision, a mood board can be the perfect tool to help you visualise and reinforce your ideas. With the right tips and tools, you can create a mood board that not only showcases your vision, but elevates it to a whole new level.